Friday, September 30, 2011

Black and White Spiders and Webs

Hello everyone!

It's been a while since I last posted...I've fallen into a bit of a depression lately and haven't really been in the mood for blogging. But I'm trying to pull myself out of it.
I finally decided that it's time to start doing Halloween themed nail designs, so I have a spidery design to share with you!

Outdoors
My rarely seen right hand!
Indoors

Materials Used:
Wet n Wild Ebony Hates Chris
Sally Hansen Whirlwind White
Konad Image Plate m1 (spider)
Bundle Monster Image Plate BM-13 (web)
Stamping Polish: Konad Special Polish in Black and White.

I tried to make each hand opposite the other. I love the way these came out, but it's kind of creepy seeing little bugs on my nails!

Thanks for looking!


Friday, September 23, 2011

NOTD: Mummy May I

Happy Friday!

I'm feeling much better, and thank you guys for the well wishes :). Of course now that I'm no longer confined to the bed, I decided to paint my nails again. Today is officially the first day of fall, so time to let go of the bright summery colors and embrace the darker hues.
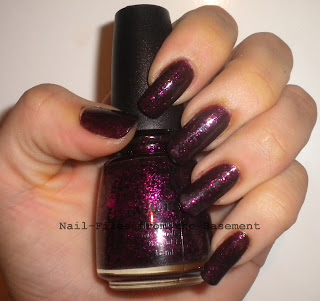
 I've been dying to use Mummy May I. I love glitter, and anything purple :). And what a cute name!

China Glaze Mummy May I- 3 Coats (Indoors, with flash)
(Outdoors, no flash)
(Natural light, without flash)
(Outdoors, with flash)
It was extremely hard to capture the glitter particles of this polish in the photos. It's been raining all day long, so no sun :(. If the sun decides to show itself, I'll definitely take some better pics of this.
Edit 9/24/11: Added new pics (#2 &5)Still no sun, but at least you can really see the glitter now.
Mummy May I has bright purple glitter suspended in a dark purple base. You can see the dark purple base after one coat, but it ends up looking closer to black after 3 coats. Beware, this polish eats topcoat for breakfast. I used 1 coat of seche vite and 2 coats of China Glaze Fast Forward Top Coat to give it a shine that I was satisfied with. I never like to leave a polish un-decorated for too long, so if I come up with an idea for nail art, I'll definitely post it.

Thanks for stopping by!

Wednesday, September 21, 2011

Polka Dots

Hey everyone,

I've been sick as a dog for the past few days :(. When I did my nails on Monday, I was just starting to get sick, so I really wasn't up for doing anything too fancy. I decided to use 2 of my newest Wet n Wild polishes, Teal of Fortune and How I Met Your Magenta, and do a simple design with dots.

Wet n Wild 'Teal of Fortune' and 'How I Met Your Magenta'
(Outdoors, no flash)
(Outdoors, Flash)
(Indoors, no flash)

I used Teal of Fortune and a dotting tool to make the dots.
I admit, I really wasn't a fan of the Wet n Wild fast dry brushes at first, but now I love them! I'm able to paint my nails neatly, which means little to no clean up after. Both polishes are beautiful, but Teal of Fortune was the showstopper for me. The indoor photo is the most color accurate in my opinion. It looks a lot closer to green than teal, and is packed with shimmery particles. How I Met Your Magenta is a hot pink polish with beautiful gold shimmer. It dries to a semi matte finish, so you might want to use top coat to gloss it up.
Both polishes were completely opaque after 3 coats. 
Wet n Wild Fast Dry polishes are still only $0.99 at Walgreens, but the sale ends 9/24. Get them while you can! For the price, you really cant go wrong.

Toodles!

Saturday, September 17, 2011

Floral Nails

Hello everyone!

Nail art inspiration sometimes comes from the most unexpected of places. Last night was a perfect example of this, as I was struck with inspiration for a nail art design while watching Married with Children. The Bundy's have been my favorite TV family for months now, thanks to Netfllix and TBS :). In the episode I was watching, Kelly Bundy was wearing a super short, tight blue dress with white flower print, and all the flowers had an orange center. Since I was already wearing a blue polish, it seemed only appropriate that I try to do a design based on the dress.  Once the episode was over, I broke out the image plates and found the perfect thing:

(Outdoors, without flash)
(Indoors, without flash)
(Indoors, with flash)
(Indoors, without flash)
Bundle Monster Image Plate BM-224
I used the image on the upper left for my index and ring fingers, and the upper center image for the rest of my fingers.

I used a dotting tool and China Glaze Papaya Punch for the center of the flowers. Note the cute little pumpkin in the upper right. Perfect for Halloween!
I love the way this turned out! What do you think?

Thanks for looking!

Friday, September 16, 2011

Twinkle, Twinkle over Deep Blue Sea

Good Morning!

For today's nails, I decided to use 2 of the polishes from my haul yesterday: Sally Hansen Xtreme Wear Nail Color in Deep Blue Sea and Twinkle, Twinkle.
Click on photos for a closer look!

Sally Hansen Xtreme Wear Deep Blue Sea, 3 coats
Deep Blue Sea is pretty sheer. I needed 3 coats for good, opaque coverage, and I probably could have still done a fourth. The color itself is really pretty. It really does look like a sea blue, with silver shimmery particles.

2 Coats of Twinkle, Twinkle over Deep Blue sea

I was a little disappointed by Twinkle, Twinkle. Looking at the bottle made me think that the glitter was dense, but it really isn't.

Sally Hansen Xtreme Wear Twinkle, Twinkle

Twinkle, Twinkle, 2 coats on swatch wheel
I do like the combination of the 2 polishes, but I wish Twinkle Twinkle was a more dense glitter. Both polishes would probably be great for layering. I love this look so much that I can't bear to cover it with art. I feel like it's pretty enough on it's own :)

Before I go, I just had to share this video I found. This woman holds the world record for longest nails! I'm curious to know how she functions daily...but take a look and draw your own conclusions!


Thanks for stopping by!

Thursday, September 15, 2011

Drugstore Haul!

Hi everyone!

And welcome new followers! Always good to have you :). I was feeling pretty restless this morning, and decided to take the long, looong walk to Walgreens and Rite Aid. Turns out it was the best decision I've made in a while, because I came home with goodies!

Walgreens is still selling the Wet n Wild Fast Dry nail color for $.99, so get them while you can! The Sinful Colors were $1.99 at Rite Aid.

L to R: Wet n Wild: FuchsiaRama, How I Met Your Magenta, Teal of Fortune, Teal or No Teal, Grays Anatomy, Sinful Colors: I Miss You, Queen of Beauty, Love Nails
L to R:  Midnight Sky, Pumpkin Spice, Set the Stage, Twinkle Twinkle, Teal-y Cool, Teeny Greeny Bikini, Deep Blue Sea, Very Cherry

I was mega lucky at Rite Aid. All the polishes had literally JUST been put on display. I could tell the salesgirl was pissed, because I snatched up a good quantity of the Sally Hansen display she had just finished putting together. But oh well! Finding Pumpkin Spice alone made the trip worthwhile. And I immediately fell in love with Twinkle, Twinkle and Set the Stage. All of the Sally Hansen Xtreme Wear polishes were $2.99 at Rite Aid. Even though I already have an insane amount of nail polish, I just couldn't pass them up.


I previously posted about using a nail polish remover jar/sponge combo to remove glitter polishes. The big one was $2.99 and the baby sized one was $1.39 at Rite Aid. I love mini sized things, so I couldn't help myself :).

Last but not least, my nails for the past 2 days:

Shown with the book I've been reading. It's zombie fiction! Due to the unfortunate lack of good zombie movies that I haven't already seen, I've turned to books to satisfy my craving for zombies. And it has! Feed is written by Mira Grant, and It's set after zombies attacked and wiped out most of the population. The book follows 2 bloggers, a brother and sister, that report the news on their blog. There's a lot more to it, but I wont spoil it for you :).
On my nails is 2 coats of Sally Hansen Nail Prisms in Golden Tourmaline.

Sally Hansen Nail Prisms Golden Tourmaline,  2 Coats
Beautiful red polish with scattered holographic particles, but chipped after not even a full day of wear :(
I'm still pooped from my journey earlier, so I'll probably redo my nails tomorrow. See you then!

Thanks for stopping by!

Monday, September 12, 2011

Multicolored Pink Nails

 Hi!

 Was your weekend too short? Because mine was! Work rolled around way too fast :(. In anticipation of the cloud of depression that usually falls over me every Monday, I decided to combat the Monday blues...with pink! All pics were taken in natural light, and are enlargeable when clicked.


Materials Used:
CND Basecoat
Orly Cotton Candy (pinkie)
Orly Basket Case (ring finger)
Sally Hansen Insta-Dri Pink Blink (middle finger)
Orly Fancy Fuchsia (index finger)
Orly Lollipop (thumb)
Sinful Colors Pinky Glitter (1 coat over index and ring finger)
Color Club Wild at Heart (stamping polish)
Seche Vite Top Coat
Bundle Monster Image Plate BM-213

As you can see, Wild at Heart is good for stamping. If I look at it really closely, I can see the holographic particles! Unfortunately, it isn't as noticeable in pictures.
I'm really loving using multiple polishes in a single manicure. It's a great way to 'test drive' a polish :)

Thanks for looking!

Thursday, September 8, 2011

Buffy the Violet Slayer

Hi!

I was in the mood for purple today, and Wet n Wild's Buffy the Violet Slayer caught  my eye.

Buffy the Violet Slayer- 2 coats (Natural Light)
I had a hard time photographing this color. It kept wanting to photograph blue, so I had to play around a little to get a good shot of this. The name is corny as hell, but all the names in this collection are corny names based around TV shows. The photo above was actually taken immediately after polishing, so you see how neatly I was able to apply it. I didn't have to clean up at all! It was a dream to work with, even though I'm not a fan of the brush.

Buffy the Violet Slayer with Pink and Black Roses

I stamped the roses with Bundle Monster image plate BM14, after applying pink blobs.

The roses were stamped with Konad black special polish over the pink blobs. I used L.A. Colors Art Deco Nail Art Lacquer in Intense Pink for the blobs. If you try to do something like this, make sure that all layers of polish are completely dry before stamping.

In the end, I didn't love it. In real life, it's a little darker than in the pictures, so it's a little harder to see the details of the roses. But at least it wasn't a total fail. What do you think?

Thanks for stopping by!

-SmokE

Monday, September 5, 2011

Jamaican Flag Nails

Happy Labor Day!

First of all, I want to thank my followers! I never thought I'd have even one when I first started this thing, so thanks you guys for motivating me to keep working at making my little blog better :)
I'm super happy today because I unexpectedly got the day off from work! In NYC, the annual West Indian Day parade is held every labor day. Even though I didn't go, I thought I could still represent my West Indian heritage at home:


Jamaican Flag Nails

Materials Used:
Seche Rose
Sally Hansen Insta Dri in Lightning
L.A. Colors Art Deco Nail Art Lacquer in Bright Green and Black (for flag)
China Glaze Paper Chasing (index finger)
Wet n Wild Fast Dry in Ebony Hates Chris (pinkie)

Black represents hardships and the strength of the people to overcome them
Yellow represents the golden sunshine
Green represents the land of Jamaica!


Yah Mon!

-SmokE

Friday, September 2, 2011

Pink Glittery Funky French!

Hey!

Hope everyone is having a great Friday. Today I have some glittery, almost sickeningly feminine nails to share with you:
Pink Slanted French With Glittery Fimo Flower Accent Nail

Couldn't you see Barbie rockin' this look? :D
Materials Used:
2 Coats of Seche Rose (Base Color)
1 coat of Orly Fancy Fuchsia for slanted french
3 coats of OPI Teenage Dream on ring finger with 2 fimo flowers
1 coat of OPI Teenage Dream over slanted french tips

I was so proud that I was able to freehand the slanted french so well on my left hand! But I had to use tape on my right hand. I'm not that great at doing my right hand yet :-/
Teenage Dream is gorgeous. I recently ordered a 2nd bottle just so I'd never be without it!

Yesterday I took a little trip to Walgreens. Thanks to a heads up from a few blogs, I was able to get my hands on some Wet n Wild polishes for only $.99! I also picked up 2 Sally Hansen Xtreme wear glitter polishes at $3.49 each; It felt like a lot compared to the Wet n Wild :-/

L to R: Rockstar Pink, In the Spotlight, 9.0.2.1.Orange, Buffy the Violet Slayer, The Wonder Yellows, Saved by the Blue, Ebony Hates Chris, Party of Five Glitters

I also got a few more things in the mail. I really need to go on a no buy.

L to R:  China Glaze Party Hearty & Cosmic, Milani Jewel FX in Silver and Gold, Milani One Coat Glitter in Ruby Sparkle, Sally Hansen Whirlwind White
Last night, I came across a cool challenge that I see other bloggers doing: the 30 Day Challenge!
I'm a little late for this month, and I have a lot of stuff planned for my favorite holiday next month. So I'm thinking maybe I'll start this in November. I can't wait! Seems like a fun thing to do :). Are any of you doing the 30 day challenge?

Have a great day, and thanks for stopping by!
-SmokE


Thursday, September 1, 2011

Stubborn Polish Removal Made Easy!

Hi!

I don't know about you, but I adore glitter nail polish. It's so sparkly and shiny, I can never seem to resist it! But it can also be a total pain in the butt to remove. I first learned about the foil method of nail polish removal here. You basically soak a cotton ball  in remover, put it on your nail, wrap your nail and cotton ball with foil, wait a few minutes, remove, and repeat. It works pretty well, but I wasn't in love with the idea of having to wrap my fingers in foil. Call me weird.
Then I remembered something my aunt gave to me years ago: a little plastic jar with a sponge in it. It was filled with nail polish remover and the sponge had a hole to put your finger in. So you stick your finger in the hole, twist it around a few times in the sponge, and voila! Nail polish gone! It had been years since I first used this, so I wasn't sure if it still existed. But it does!


I thought I'd give it a try at removing a dense glitter polish (Milani Blue Flash)...and it worked! I had to keep my finger in the jar a little longer than with a regular polish, and twist my finger around a little more, but it was worth it. Other than one or two stray glitter particles, all glitter was removed and I observed no scratching of my nail bed.  I used the one pictured, but other brands make a similar product. Being that I've never used another brand of this though, I can't say whether or not the other ones work as well.
The one that I own has 3 holes in the sponge, so you can remove polish from 3 nails at a time. It cost me less than 6 dollars, including shipping, on Amazon.com, but I'm sure it can be found at a local drugstore.
If you're the do-it-yourself type, I found a cool video here that shows you how to make one yourself.
This nifty product makes it possible for me to wear my glitter nail polishes without fear of removal.
Awesome!

-SmokE