Showing posts with label China Glaze. Show all posts

Monday, October 24, 2011

Frankenstein Inspired Nail Art

Hey guys!

Last night, I didn't know what the heck to do with my nails. I must have cleaned nail polish off of my nails about 4 or 5 times before I finally settled on the color I'm wearing now, Sally Hansen Xtreme wear in Green With Envy. I don't often wear green polish, but I really liked this one. After looking at it for a while, I was reminded of Frankenstein. At first, I wanted to do an accent nail with the face of Frankenstein. Unfortunately I didn't have the time or the dexterity for such fine detailing, due to the consumption of a couple of after work celebratory beers ;). In the end, I decided to just draw stitches, and they look awesome!
I'm pretty sure I've seen something like this done before, but as usual, can't remember where I saw it originally. Please pardon the appearance of my cuticles in these pictures. I take my best pictures in my mother's little garden, but I usually I don't make it over there until after nearly a full day of work. I wash my hands almost every 5 minutes at work, so my skin dries out really quickly during the day. I can never remember to lotion my hands after every hand wash, so my skin suffers for it :(.
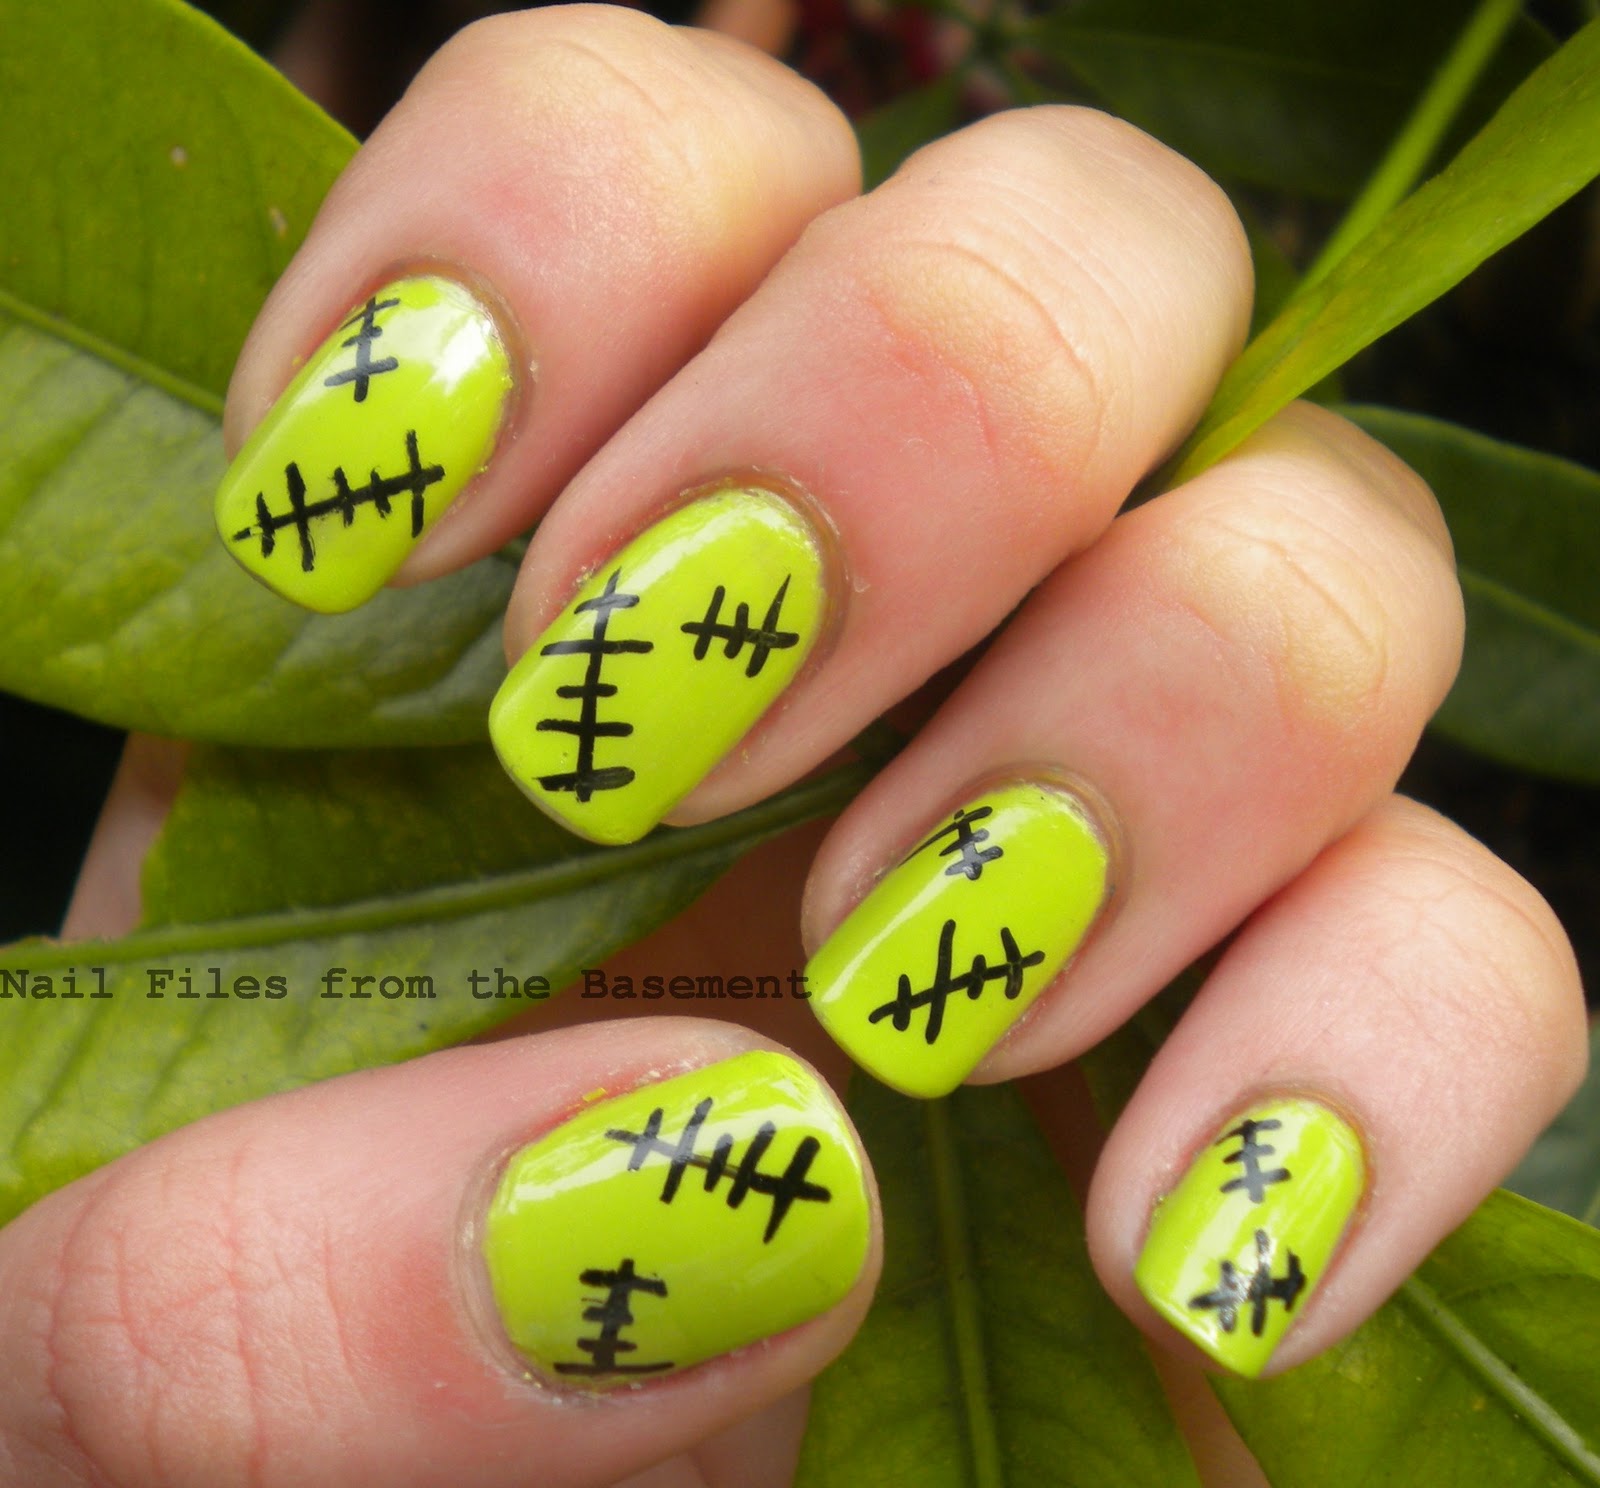

 I used a Kiss nail art pen to draw the stitches, but I'm sure a fine tipped sharpie would work just as well. Just make sure that the underlying polish is completely dry before you try to draw on it. I made the mistake of drawing on nail polish that wasn't completely dry yet, and ended up having to clean the dented mess off my nail and start over.
Frankenstein Inspired Nail Art
  I decided to use the glow-in-the-dark top coat on a whim. But I realize that the glow in the dark factor isn't even that big a deal,  now that I'm actually wearing the polish. I'm not in the dark often. I found myself closing the bathroom door and turning out the light just so I could see the glow in the dark effect, and felt like a total idiot both times.

These nails proved to be quite a distraction to some of my co-workers. I work with mostly women, so my nails get looked at a LOT. People think I'm absolutely crazy. And I'm just crazy enough to be happy about that :)
 Materials Used:
Orly Bonder Basecoat
Sally Hansen Xtreme Wear Green with Envy (2 coats)
China Glaze Ghoulish Glow-Glow in the Dark Top Coat (1 coat)
Kiss Nail Artist Fine Art Pen in Black (to draw stitches)
Seche Vite Top Coat
I wouldn't be able to live with myself if I didn't announce that The Walking Dead is back on AMC! And the second season is proving to be as awesome as the first so far. The show follows the life of Sheriff's Deputy Rick Grimes, who was shot on the job, fell into a coma, and woke up maybe a month later in the hospital to find that the world had been taken over by flesh eating zombies, or "walkers". It's a fantastic show, and I'm not just saying that because I'm a horror fanatic and an even bigger zombie fanatic. The show is about so much more than zombies. It's about people and their struggles, while in a hopeless situation. It shows both the ugliness and the beauty of the human spirit when pushed to extremes. I love love love it!! The first season is available to watch instantly on Netflix, but I'm sure free episodes can be found online. If you felt like just jumping in and watching from where it is now, new episodes come on every Sunday at 9PM EDT on AMC. If anyone out there already watches it, I'd love to hear your thoughts on it!

Thanks for stopping by!

Saturday, October 15, 2011

Vampire and Bats Nail Art

Hey everyone,

I'm back home after a nights stay in the emergency room of the worlds worst hospital. I'm so happy that I'm a nurse and have medical knowledge, because doctors will take advantage of your ignorance and turn you into a pin cushion unnecessarily. I realize now that private hospitals are out to do one thing: make money. They'll come up with reasons to perform all sorts of unnecessary tests, just so they can tack on another hundred dollars to your bill. It's so sad to say, but healthcare is nothing but a profit driven business. They don't care about people...they care about the money going into their pockets.
The one highlight of my night? A couple of the staff members noticed my nails :). I always love it when people compliment me on them. One person even asked if they were my real nails! I figured that would be pretty obvious, considering that they're so short now.


Natural Light
Artificial Light (with flash)
Natural Light

Artificial Light (with flash)

Artificial Light (without flash)
All the pictures taken in artificial lighting were taken today, just a few moments ago. The ones taken in natural light were from yesterday, when the mani was still fresh. After the fact, I realized that I forgot to give my poor little vampire a nose! I tried drawing one in with a sharpie last night, but as you can see, it didn't last (since I didn't use a topcoat)
Drawing that little vampire was no quick task. By the time I was done with him, I made up my mind that one was enough. So on my right hand, I did the bats on every finger. I like it though :). It looks interesting with the single accent nail.
I used Bundle Monster image plate BM-213 and Konad Special Polish in black to stamp the bats, over Wet n Wild Writings On The Wall. For the vampire, I used China Glaze Frosty as my base (for the glistening 'Twilight' vampire effect), Wet n Wild Vandalize for the black parts, Sally Hansen Whirlwind White for the whites of his eyes and his teeth, and Writings on the Wall again for the drops of blood on his teeth.
It's times like these when I miss my longer nails. It's nice having a larger canvas to work on, but I think he looks pretty cute on the short nail anyway. What do you folks think?

Thanks for stopping by!

Saturday, October 1, 2011

Autumn Leaves Mani

 Hi there!

 Today officially kicks off my favorite month of the year, O glorious October! Not only is it the month of my favorite holiday, Halloween, but it's also the month of my birthday. October is also the first full month of the Fall season, which happens to be my favorite season. I love to see the leaves change colors :).

All pics are enlargeable when clicked!
Right hand  (with flash)

Left Hand (with flash)

Left Hand  (no flash)

Right Hand (no flash)


Materials Used:
Sally Hansen Xtreme Wear Sun Kissed ( 2 coats)
Wet n Wild Fastdry The Gold & the Beautiful (1 coat over Sun Kissed)
China Glaze Haunting (2 coats)
Bundle Monster Image Plate BM04
Sally Hansen Insta-Dri Rapid Red (red leaves)
China Glaze Passion (gold leaves)

On my left ring finger, I tried to use Sun Kissed and Passion to make a sort of dual color effect with the leaves, but Sun Kissed didn't show up over Haunting so well. So if it looks like I have half a leaf stamped on just that finger, that's why. I'm really enjoying using multiple colors and alternating colors on each hand.  I hope you folks like it :)

Thanks for stopping by!

Friday, September 23, 2011

NOTD: Mummy May I

Happy Friday!

I'm feeling much better, and thank you guys for the well wishes :). Of course now that I'm no longer confined to the bed, I decided to paint my nails again. Today is officially the first day of fall, so time to let go of the bright summery colors and embrace the darker hues.
 I've been dying to use Mummy May I. I love glitter, and anything purple :). And what a cute name!

China Glaze Mummy May I- 3 Coats (Indoors, with flash)
(Outdoors, no flash)
(Natural light, without flash)
(Outdoors, with flash)
It was extremely hard to capture the glitter particles of this polish in the photos. It's been raining all day long, so no sun :(. If the sun decides to show itself, I'll definitely take some better pics of this.
Edit 9/24/11: Added new pics (#2 &5)Still no sun, but at least you can really see the glitter now.
Mummy May I has bright purple glitter suspended in a dark purple base. You can see the dark purple base after one coat, but it ends up looking closer to black after 3 coats. Beware, this polish eats topcoat for breakfast. I used 1 coat of seche vite and 2 coats of China Glaze Fast Forward Top Coat to give it a shine that I was satisfied with. I never like to leave a polish un-decorated for too long, so if I come up with an idea for nail art, I'll definitely post it.

Thanks for stopping by!

Saturday, September 17, 2011

Floral Nails

Hello everyone!

Nail art inspiration sometimes comes from the most unexpected of places. Last night was a perfect example of this, as I was struck with inspiration for a nail art design while watching Married with Children. The Bundy's have been my favorite TV family for months now, thanks to Netfllix and TBS :). In the episode I was watching, Kelly Bundy was wearing a super short, tight blue dress with white flower print, and all the flowers had an orange center. Since I was already wearing a blue polish, it seemed only appropriate that I try to do a design based on the dress.  Once the episode was over, I broke out the image plates and found the perfect thing:

(Outdoors, without flash)
(Indoors, without flash)
(Indoors, with flash)
(Indoors, without flash)
Bundle Monster Image Plate BM-224
I used the image on the upper left for my index and ring fingers, and the upper center image for the rest of my fingers.

I used a dotting tool and China Glaze Papaya Punch for the center of the flowers. Note the cute little pumpkin in the upper right. Perfect for Halloween!
I love the way this turned out! What do you think?

Thanks for looking!

Tuesday, August 30, 2011

Lightning Bolts!

Hi!

In my previous post I predicted that I would get bored with my nails the way they were. And surprise surprise, I did :-/. So I thought, what better time to try Nailside's Double Lightning Bolt Tutorial again? I'm holding China Glaze Blue Sparrow in my hand unless otherwise stated. All pics are enlargeable when clicked!


Here I'm Holding Sky High-Top


I used 1 coat of Orly Shine for the silver lightning bolt and 1 coat of Wet n Wild Black Creme for the black bolt. Overall, I like the way it came out. I think it looks very cool :). With the shatter polish, it kind of looks like the lightning bolts made the ground crack! And I'm so glad Hurricane Irene finally departed and gave us back the sun so I could take pictures! My camera still didn't quite capture the depth of this color to me, but its still a pretty blue.
If you haven't checked out Nailside yet, DO! She has awesome tutorials of her tape mani's.
On a side note, my engagement party is Friday! So of course I have to do something pretty with my nails. I'm thinking something pink and glittery. Perhaps Teenage Dream will make an appearance?? So stay tuned for that!

Later!

-SmokE

Sunday, August 28, 2011

Blue Sunday

Hello :)

It seems like we survived the storm! It wasn't nearly as bad as I thought it would be. All of mass transit is still shut down, so I decided to spend the day at home instead of going to work. And of course, I did my nails again:

2 coats Blue Sparrow (neon) over 2 coats Sky High-Top (Artificial light with flash)

I didn't really have an idea of what to put over it, so I just did 2 Black Shatter accent nails:
Artificial Light With Flash
Natural Light

Natural Light
Items Used (in order):
China Glaze Sky High-Top- 2 coats
China Glaze Blue Sparrow(neon)- 2 coats
Opi Black Shatter-Accent nails
INM Northern Lights Hologram Top Coat- 1 coat (accent nails)
Seche Vite Dry fast Top Coat- 1 coat all nails

I had a hard time photographing this color. In real life, it actually looks a little darker. I chose to layer Blue Sparrow over Sky High-Top because Blue Sparrow wasn't as opaque as I'd have liked and I thought Sky High-Top would compliment it well.
I'm noticing that if I like a color enough, I don't really like to cover it all up with nail art. Especially if it's a polish I'm wearing for the first time. Both true in this case :). But boredom will likely get the best of me tomorrow, I'll put a design on them, and I'll be sure to post it :)

SmokE

Thursday, August 11, 2011

Water Marbling

Hiya!

Today I decided to give water marbling a try. I've seen so many fantastic youtube videos of the technique, and wanted to create a fabulous design for myself. I think I did okay for my first attempt. This is actually my submission to the Blue Kaffee August nail art contest.


Materials Used:

Sally Hansen Insta-Dri Blue Away (Base Color)
China Glaze Sky High Top
Orly Snowcone
Orly Blue Collar
Milani Cyberspace

Enjoy!

SmokE

Friday, August 5, 2011

Orange Polka Dotted Nails

Hi!

Before I decided to get adventurous and wild with my nail color choices, I used to stick to pinks and purples...maybe the occasional blue. But for some reason I had never owned a bottle of orange nail polish. I didn't think it would look right, so buying China Glaze's Papaya Punch was a step way out of the box for me. But surprisingly, I love it!!


This was stamped with Konad Image Plate m60 using Konad white special polish.
Perfect for summer, wouldn't you agree?

SmokE

Thursday, July 28, 2011

Fun With Fimo

Hi :)

I came across Fimo Canes online and knew I had to try it. The result? A juicy, citrusy mani I cant take my eyes off of!


Tutorial by request...

SmokE

Monday, July 11, 2011

Black Fishnet with Flower Motif

Hola :)

I'm at the end of my 5 day mini vacation. The highlight was the Six Flags trip last week. Other than that, I've been happily seated on my steadily growing behind, web surfing, watching re- runs of  The Office, and eating any snacks with the misfortune of being within arms reach. I was supposed to work today, but had to run a few early morning errands. So its back to the grind tomorrow :(  These are the nails that I'll be showing off:


I loved the way this turned out. I used China Glaze Frosty as my base color (2 coats). I stamped the fishnet image from Konad Image Plate m57 and stamped the flowers from Konad Image Plate m60 over it. All stamping was done using Konad special polish in black. I didn't like the way it was looking at that point, so I filled in the flower petals with L.A. Colors Art Deco nail art paint in black, and added a pink dot to the center of each flower with L.A. Colors Art Deco nail art paint in a shocking pink color...I don't remember the actual name of it, and feel too lazy to go look. If anyone is ever interested in what the name of that pink one, I'll post it :)
I tried to do the same thing on my right hand, but it turned out to be an epic fail. It took forever to do my right thumb, and after i slightly botched my pointer finger, I gave up on trying to embellish my right hand. So the flowers stamped on my right middle, ring, and pinkie fingers only have the pink dot in the middle of them. My hand was steady enough to do that, but filling in the petals wasn't gonna happen. I thought I'd spare the world from seeing it, so I didn't take any pictures.

This design came about after a failed attempt at an uunderwater themed mani with Konad m27, and yet another failed attempt at a strawberries mani with the old Bundle Monster strawberry image. I realize that I suck at layering right now... but I haven't given up! I'm a bit behind with my posts, but I hope to catch up. Last weeks mani with Opi Teenage Dream was magical! But for now, I  must go.

Till next time....
SmokE

Thursday, June 9, 2011

Lisa Frank Inspired Leopard Nails

Happy Thursday!

As I mentioned in my last post, Thursday is nail day. This Thursday brings a fun, Lisa Frank inspired manicure. While surfing the web for nail art inspiration, I came across a video tutorial on You Tube by sayanythingbr00ke for Rainbow Leopard Nails. It does indeed remind me of a Lisa Frank trapper keeper I had in junior high school, similar to the picture below:

This manicure is colorful, fun, funky, and perfect for summer! I will warn you that this manicure is potentially time consuming, especially depending on the types of nail polishes you choose to use and their drying time. But its well worth the effort in the end.


Items Used:
Base Coat: Sally Hansen Double Duty Strengthening Base & Top Coat
Green Color: China Glaze  'Paper Chasing'
Purple Color: China Glaze 'Harmony'
Blue Color:China Glaze 'Sky-High Top'
Pink Color: Sinful Colors 'Cream Pink'
China Glaze 'Fairy Dust'
Seche Vite Top Coat
Konad Image Plate m57 Stamped with Konad Special Polish in Black
Top Coat: Sally Hansen Insta-Dri Anti-Chip Top Coat


After striping with alternating colors, I topped off with China Glaze 'Fairy Dust' for added shimmer. I'm holding the bottle in the picture because its my favorite glitter polish so far. The glitter is fine, and not difficult to remove, in comparison to other glitter polishes I've used. Make sure polish is completely dry before stamping. I fudged about 2 nails and had to re-do them because I stamped too soon. The polish took a little longer to dry than I'm used to, even with the Seche Vite. I thought it might be because some of the layers of color overlapped, leaving the polish a little thicker in spots than others. But then I thought that it could be the 95 degree heat messing with the polish. Either way, it took me about 2 hours to finish this manicure. But to me, it was worth the effort. I cant stop looking at my hands!
What do you think?

-SmokE

Tuesday, June 7, 2011

Argyle Nails

I think this is my favorite mani to date. My husband wears argyle all the time, so when I saw Konad image plate m60, I couldn't resist. And even though he's not usually interested in my manicures, he couldn't help but notice this one! After all, It looks exactly like his favorite argyle sweater.

Base Coat: Sally Hansen Double Duty Strengthening Base and Top Coat
Nail Color: China Glaze in 'Sea Spray'
Konad Image Plate m60 Stamped with Konad black special polish
Top coat: Seche Vite Top Coat


This is day 2 of this mani, and you can see the ugly chip at the side of my thumb nail. There's also some tip wear on the other nails, but I'm not surprised. My job is very rough on my hands and nails. Usually I'm pretty lucky if I can go 2 work days in a row without a single chip. Actually, I don't think that's ever happened :(. But it's holding up pretty well considering all it's been through over the last 2 days.
Thursday is usually my day of self pampering, and I cant wait to do my nails again. I'm super excited to try out my new Bundle Monster image plates. There are a lot of full nail and french tip designs in this set, and they're all larger than the ones in the first set. I am in LOVE with these image plates, and I don't know which one I want to use first. So stay tuned for that :)

Today, I get to indulge my passion for the macabre thanks to '1000 ways to die' becoming available on Netflix. I never got a chance to watch it while it aired on SPIKE, so its cool to be able to just sit and watch all of them. I'm waiting to see a nail polish related death....

SmokE

Monday, May 30, 2011

Happy Memorial Day!

Hello blog world! And a Happy Memorial Day to all :)
On this Memorial Day, I played hooky from work, and decided to start a blog. Good use of my time, no?
At the moment, I know that I want this blog to be, primarily, a means to share my nail art creations with the world. But I'm sure that my ramblings on other subjects will find its way in here from time to time. In addition to an almost shameful addiction to nail polish and nail art, I love horror movies. Zombies in particular! So maybe a movie review will find its way in here at some point...who knows? Expect other random ramblings, because I am a very random individual :)
So to kick things off, here's my Memorial Day mani:

Base Coat: Sally Hansen Diamond Strength Hardner
Flag Background: Wet n Wild Wild Shine in 'French White Creme'
Flag Stripes: Orly 'Star Spangled'
Tip Color: Orly 'Royal Navy'
Smile Line Polish: Kiss Brush On Nail Art Paint in 'Silver Glitter'
Stars: Konad Image Plate m3 stamped with Konad white special polish
China Glaze in 'Fairy Dust'  (for added shimmer)
Top Coat: Seche Vite Top Coat

The photo doesn't do this mani justice. Orly 'Royal Navy' is very vibrant, and China Glaze 'Fairy Dust' just kicked it up a notch. Unfortunately, I wasn't able to photograph it in the sun. The sparkliness is beautiful :'(

Until next time,

-SmokE